Understanding Geotechnical Drilling: A Comprehensive Guide
Release time:2026-10-12
Visits:94
Before a single brick is laid, builders must answer a critical question: Is the ground beneath us solid, or is it a disaster waiting to happen? While a flat, grassy lot might look stable, industry experience proves that surface appearances are notoriously misleading. Attempting to build without checking below is a gamble, often akin to placing a heavy stone on a hidden, water-logged sponge.
To prevent expensive failures, geotechnical engineering experts rely on a process best described as an "earth biopsy." Geotechnical drilling acts like a medical check-up for the land, extracting deep soil samples to diagnose the site's structural health. This essential ground investigation ensures that what lies beneath can actually support the weight above, providing the safety and peace of mind every project requires.
How Geotechnical Drilling Prevents Sinking Foundations and Cracked Walls
Imagine placing a heavy brick on a marshmallow versus a cinder block. That is essentially what engineers look for when they measure soil bearing capacity. It isn’t enough to simply know there is dirt down there; builders need to know exactly how much weight that dirt can support before it squishes or shifts. Without this crucial "health check" of the ground, a home or office building could settle unevenly, leading to jammed doors and those terrifying zigzag cracks in drywall that cost a fortune to fix.
Water adds another layer of complexity hidden beneath the grass. Think of the ground like a kitchen sponge: when dry, a sponge is stiff and sturdy, but once it gets saturated, it becomes soft and unstable. Geotechnical drilling reveals exactly where the groundwater table sits, warning builders if they are about to construct a foundation on the geological equivalent of a soggy sponge. If this hidden moisture isn't discovered early, the weight of a new structure can squeeze the water out over time, causing the land to sink.
Spending money to drill holes might seem like burying cash, but it acts as an essential insurance policy for the longevity of a project. By identifying these invisible hazards before pouring concrete, engineers can design foundations that stay put. To get this vital data, crews rely on specific machinery designed to slice through everything from soft clay to hard granite.
Inside the Drill Rig: From Giant Apple Corers to Precision Rock Samplers
Most people picture a standard workshop drill when they imagine this process, but geotechnical work is often more like using a giant, industrial apple corer. Crews typically use "augers"—large metal corkscrews—to spiral into the earth. A solid stem auger simply churns dirt to the surface, but when the ground is soft or sandy, engineers switch to a hollow stem auger. This tool acts like a protective straw, holding the hole open so delicate samples can be retrieved from the center without the walls collapsing.
Sometimes, the drill hits an obstacle that stops a standard auger cold: bedrock. When this happens, the crew swaps tools for rock coring methods for engineering. Using a diamond-tipped bit, they grind a circle into the stone to extract a smooth, solid cylinder. This provides a "biopsy" of the planet's skeleton, proving whether the rock is solid enough to anchor a skyscraper or if it is riddled with dangerous fractures.
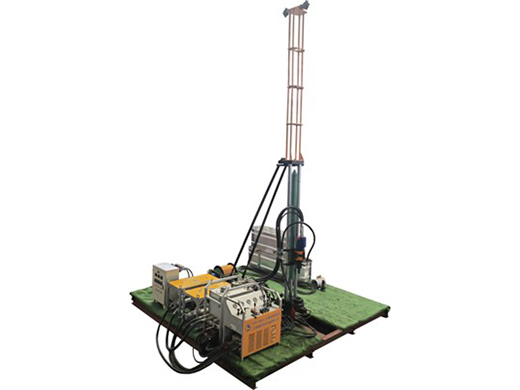
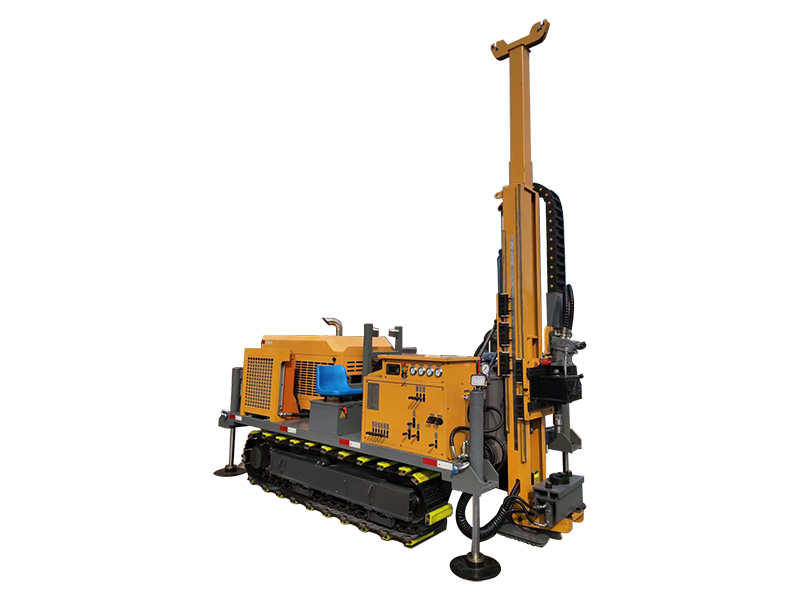
Getting these heavy machines to the right spot requires adaptability. While a wide-open construction site can accommodate a massive truck, a tight residential backyard requires different geotechnical drilling rig types:
Truck-Mounted Rigs: High power for accessible, open terrain.
Track-Mounted Rigs: "Tank-like" treads for muddy or uneven ground.
Man-Portable Rigs: Compact units carried by hand for basements or fenced areas.
Once the right rig pulls a sample, engineers perform a specific impact test to read the soil's history.
The 'Thump Test' and Layered Cakes: How Engineers Read the Ground’s History
Once the drill reaches the desired depth, the crew often performs the "Thump Test," formally known as the Standard Penetration Test (SPT). Think of this standard penetration test procedure like hammering a nail into a wall: it takes far more force to drive a nail into solid oak than into soft drywall. The rig lifts a 140-pound weight and drops it repeatedly to drive a hollow sampler into the hole bottom. The crew simply counts how many "thumps" it takes to advance the tool. High counts indicate dense, strong soil, while low counts warn of soft, unstable mush that could cause a foundation to settle unevenly.
Beyond measuring hardness, this process reveals the property’s hidden history through subsurface soil profiling steps. The ground beneath your feet is rarely uniform; it is built like a chaotic layer cake, with bands of clay, sand, and silt stacked over thousands of years. By arranging the extracted material in order, engineers create a vertical map that shows exactly where the "good dirt" ends and the risky layers begin, ensuring your building rests on the correct slice of the geological cake.
To analyze these layers back in the lab, crews use specific soil sampling techniques for construction to collect two distinct types of evidence:
Disturbed Samples: Soil that is broken up during drilling. While messy, it is perfect for basic checks on texture, color, and moisture content.
Undisturbed Samples: Pristine, intact cylinders of soil kept in their natural state. These are critical for laboratory stress tests to measure exactly how much weight the ground can hold before failing.
With these samples bagged and tagged, the physical work concludes, shifting focus to the final diagnosis.
Your Site’s Check-up: The Step-by-Step Journey of a Ground Investigation
Seeing a heavy rig roll onto a property can look alarming, but the machine’s mission depends entirely on who ordered the test. While environmental testing hunts for invisible toxins or chemical leaks, the distinction in geotechnical vs environmental drilling comes down to structural health. The crew isn't looking for pollution; they are satisfying drilling for foundation design requirements to ensure the ground has the "muscle" to support a building without sinking.
The typical workflow follows a strict path to safety:
Utility Clearing: Scanning for buried pipes to prevent dangerous accidents.
Drilling and Sampling: Extracting soil "biopsies" and performing thump tests.
Lab Testing: Stress-testing samples to measure their exact breaking points.
Engineering Report: The final "prescription" detailing how to build safely.
Once the machinery departs, the focus shifts from the field to the laboratory. This analysis phase is the core of the geotechnical site investigation process, transforming bags of dirt into the critical data needed to design a stable home.
From Borehole to Blueprint: Why Your Ground Data is Your Best Insurance Policy
Seeing a
drill rig is no longer just about noise; it’s about understanding the land's hidden secrets. Without this crucial step, even the most expensive architectural design is just a sandcastle built on a pile of marbles. By relying on thorough ground investigation, you ensure that the soil beneath is actually ready to carry the weight of what comes next.
View these upfront costs as your project’s smartest insurance policy. It is infinitely cheaper to fund soil drilling today than to repair a cracked foundation or a sinking home tomorrow. Ultimately, understanding why site characterization is important for safety changes how you see the built world: true stability doesn't start with the bricks, but deep in the dirt beneath them.